The following is a list of materials we commonly use for installing experiments in the rocky intertidal. All of these can be purchased from
McMaster-Carr. At the McMaster website you can enter the part numbers in bold below to take you to the corresponding catalog page, where you can find other choices on sizes and quantities, along with pricing.
My McMaster-Carr part number list:
Part number
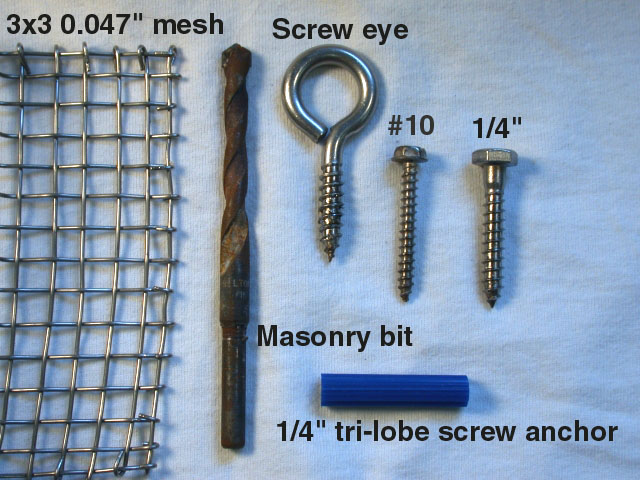
95482A145PVC Tri-Lobe Screw Anchor 1/4" Screw Size, 1-1/2" Length, Packs of 100The wonderful and ubiquitous
blue anchors you find left behind in the rocks everywhere. These require a hole 5/16" in diameter to install into the rock. Use the 5/16" drill bits listed below. These have no internal threads when first installed, so the first time you screw a bolt into them it will be a little stiff.
Part number
30425T18Type 304SS Wood Thread Wire Screw Eye 7/32" Wire Dia, 1-1/8" Shank Length, 39/64" Eye ID, Packs of 10The screw eye, installs into
blue anchors, very useful along with zip-ties for securing cages, mesh, and wires.
Part number
92351A54418-8 SS Heavy-Duty Hex Head (Lag) Wood Screw 1/4" Diameter, 1-1/4" Length, Packs of 50These have a hex bolt head on them and require a 7/16" socket to turn. They screw into the
blue anchors. Use these to bolt down settlement plates, cages, and whatever else you want. Drill a 1/4" or 17/64" hole through your object to put these through.
Part number
90286A25118-8 SS Hex Washer Head Sheet Metal Screw Slotted, No. 10 Size, 1-1/2" Length, Packs of 100These also get used in the
blue anchors, and are sometimes useful for bolting down smaller things. They use a 5/16" hex head socket or nut driver, or else a flat bladed screwdriver.
Part number
8948A14SDS-Shank Rotary-Hammer Drill Bit 5/16" Bit, 4" Drilling Depth, 6-5/8" O'all LengthUse this to drill holes for
blue anchors using your SDS-chuck-equipped Ryobi hammer drill or electric hammer drill.
Part number
8897A4Hammer Drill Bit 5/16" Sz, 9/32" Hex Shank, 2-1/2" D Drill, 4" L O'allUse this to drill holes for
blue anchors using your standard-drill-chuck equipped Ryobi hammer drill or electric hammer drill.
Part number
2945A29Hand Star Drill Bit 5/16" Drill Size, 12" O'all Lg, 1-9/16" Flute LgUse this to drill holes for
blue anchors if you don't own a gas or electric hammer drill. Bring along a hammer and prepare to suffer.
Part number
7130K19Nylon Cable Tie 7-1/2" L, 1-7/8" Dia, Bundle 50#Tensile Strg, Off-White (0.18" wide)Zip-ties, Cable-ties, whatever you want to call them. Secure plastic mesh to stuff, hold down cables, and do whatever else you want. 50-lb tensile strength is usually sufficient for withstanding waves if you use enough cable ties for the load.
Part number
9226T18Type 304 Stainless Steel Woven Wire Cloth 3 X 3 Mesh, .047" Wire Diameter Use this or a similar size for making cages and fences that will last for years. The mesh is not cheap, but gets cheaper if you buy in bulk. When mounting in the field, you can make holes through the mesh by simply drilling through it with your masonry bits and continuing into the rock below.
More stuff:
Part number
90313A10718-8 Stainless Steel Large-Od Flat Washer 1/4" Screw Size, 9/32" Id, 1" Od, .040"-.060" ThickUse these large fender washers with the 1/4" lag bolts to hold down cages or tuffies or whatever else needs some support.
Part number
8574K28Polycarbonate Sheet 1/4" Thick, 12" X 12", ClearUse Polycarbonate (aka Lexan) cut into 3"x1" strips, with a 1/4" hole drilled through the middle, to hold down cages. This can be used in place of the washers above, and obviously you can cut these to whatever size you like. The polycarbonate is much less likely to crack in half from overtightening compared to acrylic.
Part number
8560K354 Clear Cast Acrylic Sheet .25" Thick, 12" X 12"
Use Acrylic for making settlement plates in the standard 10x10cm size or whatever you like. Acrylic is cheaper than polycarbonate, so for uses like settlement plates where you need a lot of material, and ultimate strength is less of a concern, acrylic is a better choice.
Part number
5522A11 3/8" Square Drive Socket Wrench Accessory 17" Overall Length Speeder Handle, Chrome FinishThis is a useful wrench for installing the 1/4" lag bolts. If you have to put a lot of bolts in and out, this will do the job faster than a normal ratchet or hand wrench. Slap a 7/16" socket on the end. Here's another helpful hint: if you're only ever going to use this for installing bolts, have someone weld the socket onto the end of the wrench, so that you can't ever lose the socket.
You can copy and paste the contents of your McMaster cart into a word document to turn in to the purchasing office. The best method to strip out some of the HTML is to click the Print option on the McMaster order page. It will generate a new window with your order formatted for printing. Just cancel the print job and use the text in the new window to copy and paste into Word. Highlighting the order and copying it over to Word should produce a nicely formatted table.