Stainless steel mesh cages have a long association with
intertidal ecology and were a key part in some of the early studies that
created the field of experimental ecology. The early work of Joe Connell
(1961) is responsible for introducing most people to the use of mesh
cages for manipulating the densities of predators and grazers. Connell
used 22 gauge wire mesh with 8 squares per inch, formed into 6"x6" square
cages, to exclude predatory whelks from patches of barncles. All of
your favorite intertidal ecologists have probably used mesh cages at
some point in their careers, and there are a wide variety of cage styles
and construction techniques out there. All of these different cages
probably worked well, but I'm going to outline the single best method for
making cages that do the job and are durable enough to someday hand down
to your grandchildren.
 Cages deployed in the field
at Hopkins Marine Station
Materials
Cages deployed in the field
at Hopkins Marine Station
Materials
There is only one choice of material for making really durable
cages: stainless steel. Plastic mesh works to a certain extent, but
you'll have a hard time building a cage that will hold together under
vigorous wave action out of only plastic. Regular steel obviously rusts,
even when youbuy the plastic-coated stuff. If you need to build three
dimensional structures to mount on the rocks in wave-beaten areas, and
you need them to last for more than just a few months, skip over plastic
or other materials and step up to stainless steel.
Stainless steel mesh is available in a wide variety of sizes, as it
has many uses in manufacturing. We'll base this instruction set on
the assumption that you'll be ordering your stainless mesh from
McMaster-Carr. McMaster-Carr
specifies dimensions in inches rather than SI units, so this tutorial
will abide by their conventions. You can search through the various mesh
types by entering "
wire mesh"
into the search field at McMaster. Then choose either "
woven wire cloth" or "
welded wire cloth". The
differences are explained below.
There are two alloys of stainless steel mesh usually offered, type
304 and type 316. Type 304 is preferrable for our uses, as it is nearly
half the price of type 316. Type 316 is somewhat more resistant to
corrosion by harsh chemicals, but unless you're doing your predator
exclusions in some sort of sulfur-rich hot springs, type 316 will be
overkill. Stick with type 304, which will not rust even after years in
the field.
Dimensions
The size of the mesh that you use in your cages is obviously set by
the minimum-sized organism you need to contain or exclude. If you're
keeping out grazing limpets for example, you want to consider how small a
shell size will fit through your mesh. Realistically, you'll have to
balance the animal-filtering ability of your mesh versus the impact that
the mesh will have on water flow and shading of the substrate under
the cage. Keeping out the most voracious adult-sized grazers or
predators will often be sufficient, and taking some care to open the cage
to remove smaller interlopers every few weeks will likely be enough
to remove the effect of that animal on the experimental plot. With
this trade-off in mind, you can choose a mesh size.
Mesh is sold by a variety of dimensions. You can choose mesh based on the
size of the openings in the mesh. An equally common method for shopping
is to choose mesh by the number of squares-per-inch (i.e. 1x1,2x2, 4x4).
A 4x4 piece of mesh has 4 squares per 1" of linear dimension.
You will also need to specify the thickness of the wire that makes upthe
mesh. A good all-around wire diameter is 0.047". The 0.047" size holds up
well for month or years, and is still thin enough to be workable when
you're constructing the cages.
Mesh style
There are two categories of stainless steel mesh that we will
consider: Woven wire cloth and welded wire cloth.
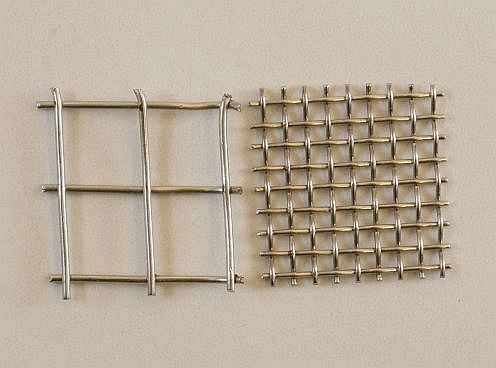 Welded wire cloth mesh on
the left, woven wire cloth mesh on the right
Welded wire cloth mesh on
the left, woven wire cloth mesh on the right
Woven wire cloth is available in sizes from 2x2 through 16x16
and smaller. Welded wire cloth is only available in larger sizes, from
1x1through 4x4. If you need to exclude very small organisms, you will
end up using woven wire mesh in sizes from 4x4 through 8x8 or smaller.
If you are going to build large cages with large holes to only keep
out large organisms like bird and fish, you will need to use the welded
mesh in sizes up to 1x1 (~1" opening).
Which style is better?
As mentioned above, for large-opening cages (>1/2" openings), you will be
better off using welded wire mesh, and also using a larger, stiffer wire
diameter (0.063" or 0.08"). The stiffness of a cage is tied to the mesh
opening size and the mesh style (welded or woven). When you
have relatively few strands of wire making up the cage (1x1, 2x2 cages),
a woven mesh cage would not be strong enough to withstand flexing
under breaking waves, as it would simply fold over. A welded wire cage
will be inherently stiffer.
The stiffness of welded wire comes with some costs though. It is
more difficult to make complicated shapes with welded wire,
particularly circular features. Welded wire doesn't move and flex as well
as woven wire when you're bending it, so the welded mesh will either
start popping apart at the welds, or just get kinked. Welded mesh is
best reserved for simple slab-sided square cage styles where only
simple bends are involved, or perhaps hexagonal fences. Welded wire cages
also fatigue after time due to their stiffness. A cage sitting in the
field getting hit by a wave every 10-15 seconds during high tide for
months at a time will undergo a huge number of flexing cycles, which will
cause welds to start to fail and the integrity of the cage to fall apart.
This is one reason for using larger wire diameters in cages made with
larger mesh sizes, as it stiffens the cage and reduced the amount of
flexing with each wave, reducing the amount of fatigue in the structure.
Woven wire mesh is a good choice for cages with smaller openings
(3x3, 4x4, 8x8 etc). Woven mesh is easier to bend and form into
complicated shapes such as circles. Woven mesh is also capable of being
woven together at corners and seams, since you can leave longer pieces of
wire hanging off your cuts that can then be woven. When you get into the
very small mesh openings (6x6, 8x8 etc), welded wire mesh, if it
was available, would be horrible to work with. At these smaller mesh
sizes,the structural integrity of the cage is good because there is so
much material in the structure. The completed cage can flex a little
with each wave, but there are no welded joints to fatigue and fail over
time. Woven wire mesh cages have no trouble standing up on their own in
mesh sizes up to 4x4.
Construction
Cages, fences, cage controls and other structures come in a
variety "standard" shapes and sizes. Some people prefer circular plots,
others like simpler square or rectangular plots. All cages need some sort
of flange to allow them to be bolted down to the substrate. This takes
the form of a section of mesh bent out horizontal around the bottom edge
of the cage. This flange should be >1.25" wide to give you some leeway
in positioning the cage over holes in the rock. My cages usually have
a 1.5" wide flange around the bottom. Stainless steel lag bolts get
pushed through the mesh flange and screwed into plastic masonry anchors
in the rock.
For all cage styles, try to make the whole structure out of one piece
of mesh rather than trying to tie multiple pieces of mesh together into
a structure. Structures bent up from one piece of mesh will be
stronger than a pieced-together mess.
To cut the mesh, get a pair of tin snips. Tin snips come in
straight, left, and right cutting styles. Any style of tin snip will be
fine for this job. Straight-cutting tin snips are show on the right in
the picture below.
 Vise-grips on the left,
tin snips on the right
Vise-grips on the left,
tin snips on the right
If you have access to a jump shear in your shop, you can make
large straight cuts quickly. This can be useful for cutting your big roll
of mesh into individual pieces that eventually become the cages. You
will still need the tin snips to make smaller cuts in the mesh for
bending. Don't try cutting the mesh on a band saw, it will just get
messy.
For making bends in the mesh, the best option is to find a
sheetmetal brake in the shop. This will let you make most of the bends
easily. If you don't have access to a brake, there are other ways to bend
the mesh. The most burly method is clearly to bend it using your teeth.
If you aren't up to that, I recommend finding a sturdy table with a top
that sticks out a little ways. Using some c-clamps and a long piece of
wood or metal, you can clamp one part of the mesh to the table, and then
bend the other portion over the edge of the table. To get nice crisp
bends you can take a hammer to the mesh to make sure it bends sharply at
the edge of the table.
 Bending mesh over the edge of
a work bench
Bending mesh over the edge of
a work bench
The round fence shown below was bent in this manner. The entire
long strip of mesh was clamped to the edge of a workbench so that half of
the mesh was sticking out. I then went along with a hammer and pounded
the mesh down until it was bent at 90 degrees. After the entire piece
was bent I took it out and put the circle bend in it. The cuts around
the flange of the fence are spots where I had to cut the mesh to allow me
to get the circular bend in the mesh. The fence is then closed with
zipties, or you can use any long pieces of wire sticking out the ends
of the mesh to weave the two ends together.
 A 20cm diameter fence made
from one long piece of mesh
A 20cm diameter fence made
from one long piece of mesh
The square cage below was built in a slightly different fashion. Thecage
is 10x10cm, so it is fairly small. I made the bends in this cage
by clamping it in a bench vise and bending the mesh over. The initial
piece of mesh was cut to resemble a big
+sign.
Each arm of the
+ was bent down
at 90 degrees relative to the center, and then each arm was bent out
horizontal to form the flange. The four sides of the cage meet in the
corners. I purposely left the wire mesh edges long when I cut the
+ shape. These long ends could then be
weaved through the adjacent pieces of mesh to close the corners. Weaving
the mesh together like this produces a very strong and stiff cage that is
also fairly well sealed against animals getting in and out.
 A 15x15cm full cage
for excluding whelks
A 15x15cm full cage
for excluding whelks
 Excess wire on ends of mesh
is folded over adjoining wire to tie the two sections together
Excess wire on ends of mesh
is folded over adjoining wire to tie the two sections together
The weaving process makes use of the other pair of pliers pictured
with the tin snips above. These are small needle nose Vise-Grip pliers.
I prefer these to normal pliers because they allow you to lock on to
the wire while you're bending it, relieving you have having to squeeze
as hard as you can the whole time. After weaving and bending a few
hundred wires for a set of cages, your hands will thank you.
 Leaving extra wire hanging
off the ends of cut mesh
Leaving extra wire hanging
off the ends of cut mesh
If you are using woven mesh, the ends of the mesh pieces will have
loose ends sticking out. After time those loose ends can start to fray
and pieces of wire can pull out. This often happens around the edges
of flanges. The solution is to clean up the cut edges by bending the
loose wire back over on itself, wrapping it around the wires
running perpendicular to it. In the image below I have bent the loose
wires around the corner over and under the wire that crosses them. This
makes it impossible for the mesh to come apart, and has the added bonus
of making the cage safer to handle, as you won't get poked by the cut
ends of wire.
 Loose ends of wire are
folded over the crossing wire to tie the edges together
Loose ends of wire are
folded over the crossing wire to tie the edges together
The other option is to take a material such as Z-spar epoxy putty
and form it over the exposed edges of the wire mesh. This will help hold
the wires together, and makes the edges smoother for handling. The
down side to this method is that epoxy putties are brittle, so when you
need to bend the cage around features in the rock you make end up
cracking the putty.
Most of the above info pertains to woven mesh cages. When using
welded wire mesh, the assembly process is somewhat simpler. You do not
need to bend over the loose edges, as the welded wire will not unravel.
You would still do well to leave extra wire sticking out at cage seams
so that you can weave the seams together for a tight fit. This also
helps strengthen the cage.
Mounting cages in the field
Cages should be mounted using the standard plastic masonry anchors
and 1/4" stainless steel lag bolts.
Masonry anchors are available from McMaster-Carr, search for part
number 95482A145. There are other lengths available besides the part
number given here. A common lag bolt from McMaster-Carr is part
number 92351A544, and again, there are multiple lengths available. A
larger list of useful field equipment and pictures can be found here:
https://www.lukemiller.org/journal/2005/05/field-equipment.html
In the larger mesh sizes you can simply slip the bolt through the
mesh openings and screw it into the rock. For smaller mesh sizes (6x6,
8x8), you will need to punch a hole through the mesh to get the screw
through. My favorite technique is to just take the hammer drill that you
use to drill holes for the blue anchors and drill through the mesh. I
usually do this out in the field at the same time that I'm installing the
blue anchors, so that I can easily line up the holes.
For all mesh sizes, you will need some sort of washer or plate to put
onthe lag screw to help spread the load on the mesh. The heads of the
lag screws are fairly small and will pull through the mesh after a while.
I use either large stainless steel washers, or pieces of plastic cut
into 3"x1" strips with a >1/4" hole drilled through the middle. These
help spread the load over more the mesh, and also help keep the mesh
from folding up and allowing animals to sneak in.
For washers, a good example would be McMaster-Carr part number 90313A109.
You can also simply search for "washer" at McMaster and choose a size
that suits your budget.
If you're going to use plastic pieces instead of washers, drill the
hole with at least a 17/64" drill bit. This will give you enough play to
get the 1/4" lag bolt through.
One or two bolts for each side of a cage will be sufficient to hold
it down to the rock. The image below shows a 4x4 mesh cage bolted to
the rock using both stainless steel washers and plastic pieces.
 A cage deployed in the field
That's more or less it for making cages. There are plenty of
variations on this basic theme depending on what you're trying to
accomplish.
Some other thoughts:
One common modification for cages that you need to open for censusing
is to leave the top of the cage open (i.e. make a fence) and zip-tie
a piece of plastic mesh over the top of the cage to seal it. The zip
tiescan be cut and replaced each time you need to access the
cage. Alternatively you can unbolt the cage from the rock at census time.
If you're doing point-contact counts in small plots, it will probably
be easiest to simply unbolt the entire cage for counting.
For instances where you're dealing with small organisms that crawl
along the rock surface, some people sandwich strips of neoprene
rubber (wetsuit material) between the cage flange and the rock.
Cages will eventually get algae settling on them. This can be detrimental
to your experiment, so you may occasionally need to clean the cages. Some
people use stiff wire brushes to clean the cages. A more effective method
is to kill the algae either by boiling or with direct flame. Chris Harley
introduced me to the idea of bringing a Colemanstove out into the field
and heating up a big wok full of water. Hot enough water will kill the
algae and it will slough off during the next tide. A propane torch
applied directly to the algae also works well.
Cage controls are a messy subject, and there are several styles
outthere. All of them have their downsides and introduce unwanted
artifacts that differ from the full cage treatment. Cage controls all
have someside or sides open so that the organisms of interest can move
in and out. Some cage controls concentrate solely on mimicing the
shading effect of the full cage, so they might have a piece of mesh held
up on 4 posts. Other cage controls are concerned with also mimicing the
effects of the cage on water flow, so they only have small sections of
the sides removed, or perhaps two full sides removed.
 A style of cage control with two
open sides
A style of cage control with two
open sides
The choice of cage control is up to you, but consider what factors
you think are most likely to cause experimental artifacts when caging
a plot, and design your cage control to *properly* mimic those effects.
Luke Miller
April 2006