A relatively cheap, relatively water-resistant CCD camera housing
My study on barnacle feeding habits (Marine Ecology Progress Series v.349 p:227-234) required a relatively small video camera system that could be deployed in the intertidal zone and withstand submersion during high tide. The goal was to leave the camera deployed for weeks on end. Power would be supplied from dry land, and the video signal would be sent back to dry land via cable to minimize the need to access the camera housing directly. I eventually ended up leaving the camera deployed in the field for over three years, with just a few interruptions to redeploy it for new projects.
I based the equipment around a small black and white CCD video camera, the Watec WAT-502A (since superceded by the WAT-502B). This is a 1/3" CCD sensor chip in a small package (~2" long, ~1.2" height + width, plus the added length of a lens) that is powered by a 9V DC input, and outputs a standard definition video signal over composite video cable. It has a fairly common CS lens mount. The camera is very sensitive in low light, and is sensitive in the near-IR wavelengths as well, so that you can illuminate an area with IR light at night and still get a usable picture. The newer model is even more sensitive in low-light conditions. The specs for the camera:

The housing I built was based off of a standard 2" PVC plumbing pipe tee. I bought clear pipe for the bling factor. I glued a 2" male slip to 1.5" female threaded adapter into each leg of the tee to allow the use of 1.5" threaded pipe plugs as end caps.
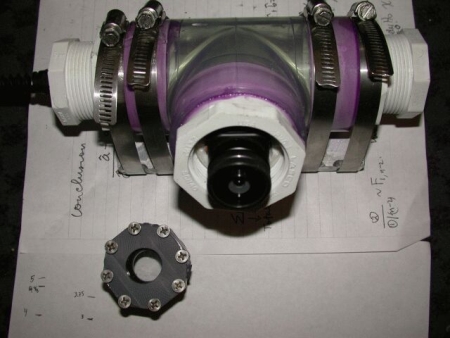
For two of the caps, I drilled, tapped, and mounted a nylon liquid-tight cord grip in the center. The cord grips, which come from McMaster-Carr, are fairly water tight. I used the McMaster part number 69915K62, which will accomodate a wire diameter of 0.08" - 0.24", and uses a 3/8" NPT male thread to mount into the pipe cap. One pipe plug would allow the power cord for the camera to enter the housing, and the other pipe plug allowed the composite video cable to exit the housing and run back to dry land.

The camera was mounted in the third leg of the tee. I machined a custom holder that gripped the camera body and could then be threaded in to the 1.5" NPT thread in that leg of the tee.

The camera holder was threaded far enough in to then allow me to screw in a pipe plug to the same 1.5" thread. This pipe plug had a hole drilled through the center, and a counterbore on the outside face. The counterbore held a round piece of clear Lexan for the camera to shoot through. The Lexan window was glued into place with standard 2-ton epoxy. Lexan (aka polycarbonate) is preferrable to regular acrylic because it withstands scratching and impacts better.

The picture above was taken after several months of deployment. The center of the Lexan window is still clear and scratch-free.
All screw fittings were backed up with some Plumber's Goop polyurethane sealant to add another layer of sealing. The power and video cables were standard household stuff, but I jacketed them in vinyl tubing to withstand abrasion on the rocks.
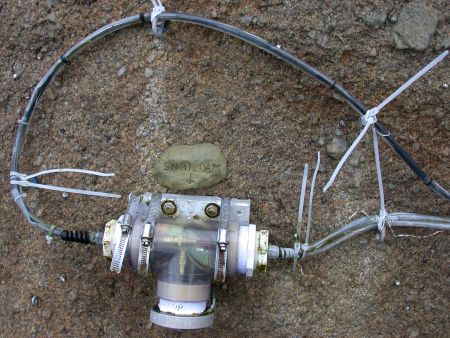
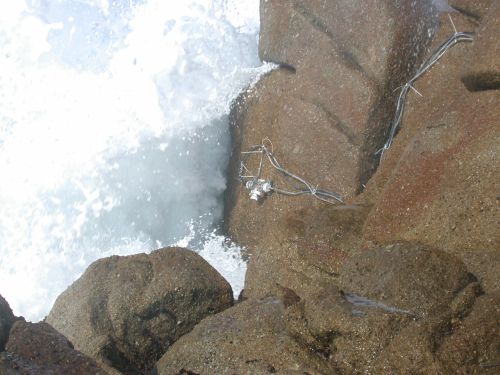
The entire housing was mounted in the field (see first picture above) by first bolting a mounting plate to the rock. A set of 4 stainless steel band clamps then wrapped around the base plate and the camera housing. This allowed the housing to be rotated in one axis for final positioning.
This system was used in a few variations over the years, including the barnacle feeding study mentioned above. In some of the pictures shown above you can also see the ring of infrared LED's that I used to illuminate a patch of rock at night. This proved to be extremely effective for recording during nighttime low tides, though it would be less useful underwater because the near-IR wavelengths attenuate so quickly.
Some footage from the barnacle feeding study:
More explanation of what you're seeing here can be found in this older post.
posted by Luke Miller at 1:18 PM
![]()
![]()