Sunday, March 27, 2005

That's a big lens


I picked up a Sigma 50-500mm f/4-6/3 EF mount lens. It's large. About as large as a 5 lb. dachshuahua mix.

Thursday, March 17, 2005

Snail polish

(S)nail polish comes in all sorts of colors from many brands. We use it primarily to mark the shells of snails which we are rereleasing into the field. Therefore, we need snail polish which holds its color for weeks in the sun, and doesn't chip off too easily. At this point there are a few brands which seems to work well, and one that definitely sucks.

The Great: Sinful Colors Professional, Blue
The Good: Almay Hypo-Allergenic Nail Enamel, "Fire"
Wet 'n' Wild Nail Color, Red 406a

The Bad: Revlon Nail Enamel, "Sunsparks" 650

The Sinful Colors blue nail polish is awesome, it stands up well to sun and chipping, and blue is a great color for finding snails in the intertidal.
The Almay and Wet'n'Wild are decent also, they hold up to sun exposure for a few months.
The Revlon, although it probably cost the most out of any of these nail polish brands, is absolute garbage when it comes to sun exposure. After 3 weeks in the sun, the majority of our snails have faded to a light tan color, making them hard to find.

It should be noted that supergluing tags onto nail polish is a risky proposition. We've lost several tags which peeled off of the nail polish underneath, perhaps because it was just too smooth a surface for the superglue to adhere to. I would recommend leaving the portion of the shell which will hold the tag bare, and glue directly to the shell. The usually porous shell material bonds very well to superglue, and we have many tags still surviving after 6 months in the field.

Our snails always get a topcoat of clear topcoat nail protector over the colored snail polish and the glued on tag.

Tag making: Bee tags are often mentioned as a great way to tag intertidal snails, but they can apparently only be purchased from one vendor in Germany who has no website and purportedly speaks no english. This means you get to order them via regular mail, and they're not cheap.

Instead of purchasing tags, I started using homemade tags. The tags are printed in a laser printer on HP LaserJet Tough Paper, which is a plastic-based paper. You can print in black or in full color on this paper, and then cut out your tags. Black ink is the most persistent under UV exposure, so don't rely too heavily on numbers or markings made with colored toner. Use the color to make the tag noticeable in the field.
It should be noted that superglue (cyanoacrylate) will dissolve the laser toner off of this paper, so you need to excercise care and only apply superglue to the underside of tags. Give the dried tag a top coat with clear nail polish.

Saturday, March 12, 2005

Blowing out an unused GRUB booter

I had an unused version of ubuntu linux installed to dual-boot with WinXP. I recently did some hard-drive swapping, and wanted to get rid of the linux install for a while. I initially just tried deleting the partitions which held the linux install, but upon restart I got a GRUB error as GRUB tried to find the linux install that it thought should be there. To fix this, I had to boot up with the WinXP recovery CD, and enter the recovery console mode. Once at the recovery console, it was simply a matter of typing fixmbr and hitting enter. Upon restart, WinXP loaded right up and didn't lose any of my XP data. Good stuff.

This program makes me feel all warm and fuzzy

As I've accumulated more and more data through my thesis project, I've become more and more concerned about the integrity of my backups. I keep copies of my data on a second hard drive in my main computer, on a raid-5 array on a remote server, and make backups of every thing to DVD's a few times a year. I rely on the fact that all those data are copied correctly, and so it's nice to have a utility which will verify that each copy is identical. This program has been quite useful in that respect:

http://www.md5summer.org

Although I've yet to experience a problem during these md5 checksum checks on copied data, it's still reassuring to have this little utility run through my data before and after backing up to make sure nothing has been reproduced inaccurately. It runs through 13.4 GB of data in around 20 minutes. If something is copied wrong, this program should catch it and report back with an error for the file that was copied wrong.

Wednesday, March 09, 2005

So you broke the lens off of your Olympus 5050 digital camera

I like my Olympus 5050 digital camera to a certain extent, but it's not immune to being dropped from chest height when the lens is extended. Unfortunately, the only time I drop this camera is when the lens is extended (neck straps are for wusses). Both times I've dropped the thing, the lens barrel has popped out of place. Below I'll detail how I put the lens barrel back into the camera and got things working again.


When you first pick up your busted camera, the lens will probably still be in the body. Cross your fingers and try shoving the lens back into place, but if this doesn't immediately work, you need to pull the lens apart. However, don't pull anything apart until you've got the camera over a table or towel or something to catch the tiny pieces that will fall out.

Pry the lens barrel out of the camera, and collect the little metal nubs that fall out with it. There are 6 of these total, but some will stay attached in the lens barrel you pulled off.


Shake the camera body and try cycling the power off and on a few times until you get all of the loose pins out of the camera body. Also pull out the thin plastic trim ring from where it sits around the lens.


With all your nubs collected and the lens barrel sitting ready, start remounting the nubs in the lens barrel. The conical nubs go in the forward hole (towards the glass)and the regular round nubs go in the rear hole of each pair. See the picture below.


I used superglue (cyanoacrylate) to glue these nubs back into the plastic lens barrel. They will not withstand the reassembly process later if they aren't glued in, so you need to do this step. Don't allow glue to build up around the nubs either, as it will interfere with the nubs' function. This is not a job for JBWeld, only superglue.


Once the nubs are remounted in the lens barrel, you're ready to put the camera back together. I think I kept the zoom all the way wide for this step, but I'm not sure it really matters. Set the camera with its back down on the table. If you stare into the camera body, you'll see 5 indentations around the edge of the area where the lens barrel should go. They are denoted by the arrows in the picture below.


The slots in the body and the nubs on the lens barrel only fit together in one orientation, so you can't really mess that up. Slide the lens barrel down over the inner lens (notice the three nubs around the edge of the inner lens, these line up with three slots on the interior of the lens barrel). When you've got lens barrel nubs lined up over the 5 slots, it's time to get with the manhandling.

The nubs need to be forced back into the tracks in which they ride inside the camera body, and it requires deforming the lens barrel enough to slip the nubs into place. I used one hand to push down on the lens barrel, and the other hand to use a thin flat blade screwdriver to tweak the lens barrel around the nubs and pull the plastic of the camera body out of the way. I started with the lower left pair of nubs and worked my way around from there. You don't have to shove the lens in very far at all, but it definitely requires quite a bit of force.

In the picture below you can see the nubs are back in their slots, just below the surface of the mounting ring. That's as far down as they need to go, so don't keep forcing things looking for some mythical second slot.


At this point, with all the nubs in their slots, you should try cycling the zoom in and out and the camera on and off. The off-on cycle is the true test that things are working. If you succeeded, the camera lens will retract like normal. It might make a bit more noise or sound more "wobbly", but it should work. If any of the nubs popped out of their holes in the lens barrel during the reassembly, you'll hear them rattling around or grinding when the camera tries to retract the lens. If this is the case, you get to take apart the lens and try again.

Once you're convinced that the lens is retracting properly, reinstall the little trim ring that you pulled out earlier.


This should just slide down into place and sit in the slots in the body. I'm not sure what function it serves, and it could probably be left out, but it's up to you. Just make sure you pull this ring out when you first try to disassemble the camera, as it makes reassembly impossible if the ring is still in the camera.

Like I said, I've dropped this camera twice and knocked the lens out, but the camera still works great and takes perfect pictures. I'm sure you're worried that the focus will be knocked out of alignment or some such thing, but it hasn't happened to me yet. Good luck with yours.

Changing default text import origin type in Excel

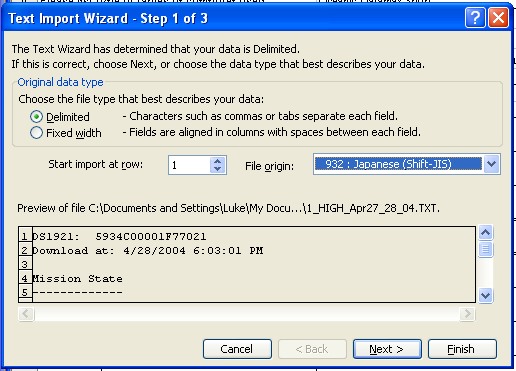
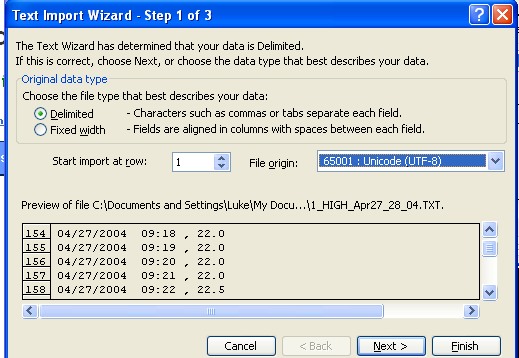
Importing iButton temperature data from text files into Excel is helped by having the text imported in the proper format for your later usage. For some reason, my version of Excel wanted to import text files using a Japanese origin, which gave me date formats and degree signs where I didn't want them.


I wanted my text to come in as Unicode, and since I import a lot of files, I wanted this as the default to save a step or two when importing. You'll notice in the picture below that when you choose Unicode, it shows a value just to the left (65001). Write this number down, you'll need it in a second.


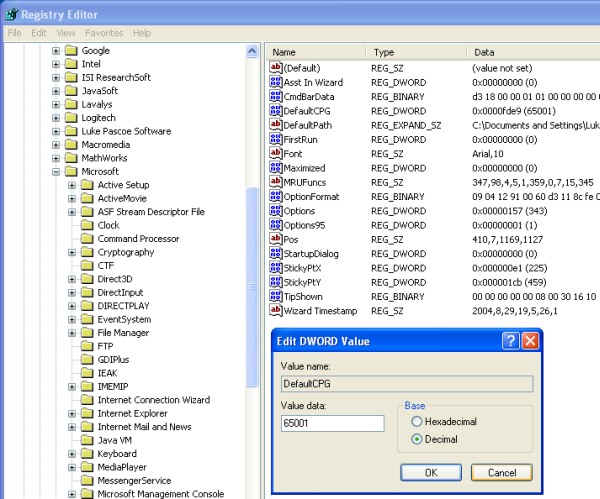
You can change the default choice by running regedit from the Program>Run menu item. Once in the Registery Editor, navigate to HKEY_CURRENT_USER>Software>Microsoft>Office>11.0>Excel>Options
Once here, you'll see a few registry entries for Excel 2003.
Right click in the right-hand window and choose New>DWORD
Call the new DWORD item DefaultCPG and hit enter.
Then right click on DefaultCPG and choose Modify.
Set the Base to Decimal, and enter the decimal value for Unicode UTF-8 (65001 in this case), then hit OK.

A pair of potentially useful sensors

http://www.envirotechsensors.com/SVS1_Sentry.htm

From their site
"Measures atmospheric visibility, also known as meteorological optical range (MOR) by determining the amount of light scattered by particles (smoke, dust, haze, fog, rain, & snow) in the air that passes through the optical sample volume."

This probably won't be useful for measuring low cloud cover or high fog layers at night.


$299, takes 8 thermocouple inputs of all types (K, T, J etc) and feeds them in through a USB port to included software for recording.