Making an extendable remote release for the Canon 20D
I ordered a remote release off of EBay for $17.50+shipping. It's made
in China by a company called Adidt. The release is called the Adidt
M1 Remote Cord. It fits a variety of Canon digital SLR's which use the
N3 style remote release connector, and is a cheaper (much
cheaper!)substitute for Canon's own RS-80N3 remote release.

This a picture of the Canon 20D remote release connector on the body:

It has 3 pins inside. The top pin is the common pin. The lower right pin activates the autofocus when connected to the common pin. The lower left pin activates the shutter (and autofocus if not already focused) when connected to the common pin.
The quest here is to make this remote release cord longer when needed. The stock cord is 32 inches long. What follows here is a demonstration on how to splice in a pair of stereo headphone jacks in order to allow the use of common stereo headphone extension cords to make a longer release cable.
I used one male and one female 3.5mm (1/8") diameter stereo headphone jack.
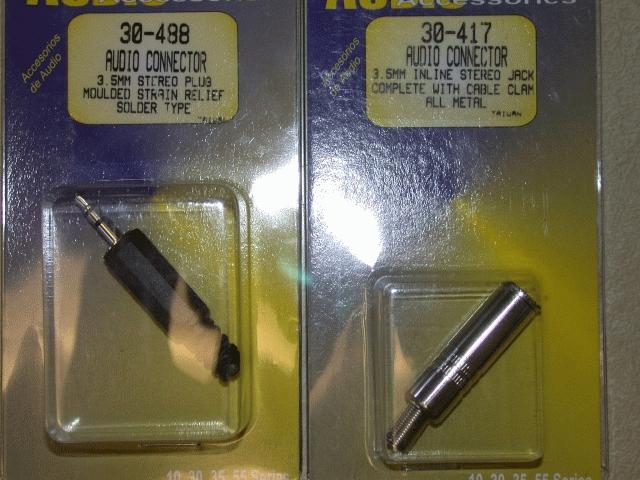
These were purchased for $4 total. They are designed so that you can unscrew the housing of the connector and solder your own wires to the connector.
The first step in the process was to cut the Adidt remote release cordin half. This revealed 4 wires inside the outer jacket of insulation.
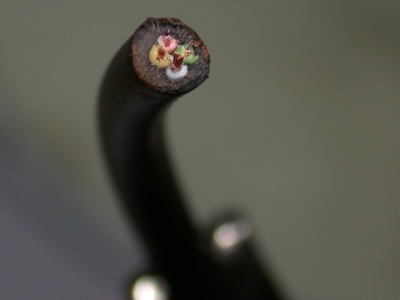
Three of the wires function in the remote release, the 4th green wire is superfluous.
The white wire acts as the common wire, and attaches to the top pin in the Canon body pictured above. The yellow wire is the Focus wire, and attaches to the lower right pin in the Canon body. The pink wire is the Shutter wire, and obviously this attaches to the lower left pin in the Canon body.

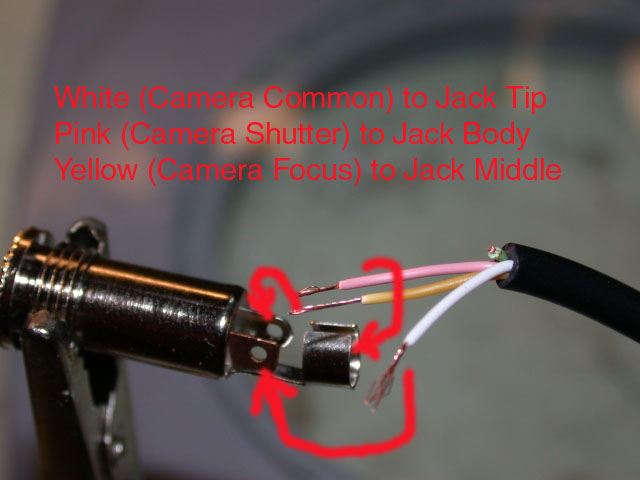
I cut the green wire out of the way, and stripped the insulation off the other three wires. The female stereo jack was up first. I attached this to the N3 plug end of the Adidt cord. After sliding the strain relief and body housing down the Adidt cord (so that they can be assembled after soldering the wires), I picked where I was going to solder each wire. The only requirement here is that you be consistent when choosing where to solder each wire onto the plugs. I chose to run the white wire to the post corresponding to the tip of the stereo plug. The yellow focus wire was soldered to the post for the middle segment of the stereo plug. The pink shutter wire was soldered to the body of the stereo plug.
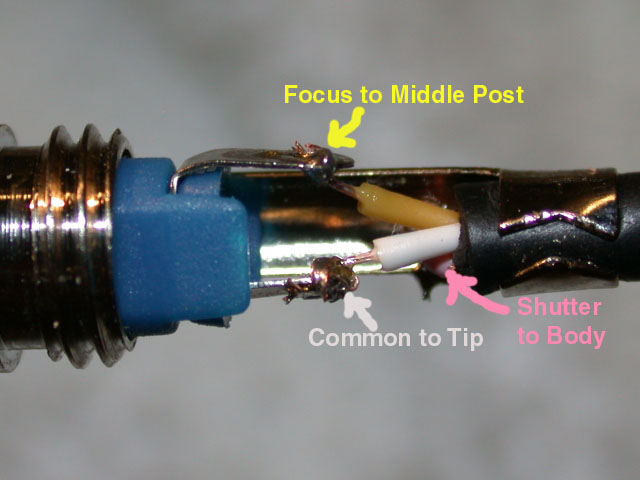
The completed soldering job is pictured below. Make sure to clean up any loose strands of copper wire so that you don't accidentally make contact between two of the posts. Before sealing all this up, plug the N3 connector into the body and use a bit of paper clip or tweezers to short across the pairs of pins. Do this to ensure tht your wiring is intact. Additionally, try plugging the male stereo jack into the female jack and shorting across the pins of the male jack. This further ensures that you have continuity through the plugs. After soldering and testing, I crimped the strain relief around the outer black insulation of the Adidt cord in order to take any strain off of the solder joints themselves.

Whatever pattern of wiring you commit to on the female plug needs to be replicated on the male plug. As shown below, I once again soldered the white common wire to the tip post of the stereo plug, the yellow focus wire to the middle post, and the pink shutter wire to the main body post of the stereo plug. The strain relief was then crimped around the outer insulation of the Adidt cord.
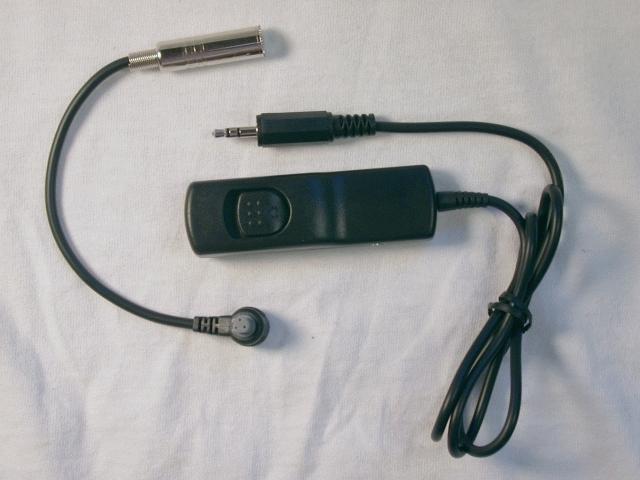
After all the soldering and reassembly was complete, I had a functional remote release cord once again. For normal 3-ft cord length, I just plug the stereo jacks together. If I need a longer cord, I can simply insert a stereo extension cord in between my male and female jack to give meany length of cord I need.
This entire project, including the cost of the remote release unit, shipping, and the stereo plugs, cost $25. That doesn't include the cost of whatever stereo extension cord I end up getting in the future, but I have several laying around from other projects already. The splicing takes about 30 minutes if you're all set up and ready to go.
I'll also add a comment on the Adidt M1 remote release cord for those who are contemplating purchasing it. First off, it's cheap, both inprice and construction. That's okay though, since it's not doingany thing complicated. The switch is designed with only one button. Holding the button halfway down activates the autofocus, just like pressing the shutter button halfway down on the camera body. If you continue to push all the way down, the shutter activates. The operational feel is similar to the shutter button on the camera in terms of pressure, but it obviously doesn't feel as high quality as the camera's shutter button.
For bulb exposures, the Adidt remote release button is pressed all the way down, and then slides forward to lock into place. With the camera in bulb mode and the switch locked forward, the shutter will stay open until you come back and release the switch on the Adidt control. This feature alone justified the price of the release for me, as it makes long night exposures infinitely easier, allowing you to leave the camera and go grab another beer during the exposure.
This a picture of the Canon 20D remote release connector on the body:
It has 3 pins inside. The top pin is the common pin. The lower right pin activates the autofocus when connected to the common pin. The lower left pin activates the shutter (and autofocus if not already focused) when connected to the common pin.
The quest here is to make this remote release cord longer when needed. The stock cord is 32 inches long. What follows here is a demonstration on how to splice in a pair of stereo headphone jacks in order to allow the use of common stereo headphone extension cords to make a longer release cable.
I used one male and one female 3.5mm (1/8") diameter stereo headphone jack.
These were purchased for $4 total. They are designed so that you can unscrew the housing of the connector and solder your own wires to the connector.
The first step in the process was to cut the Adidt remote release cordin half. This revealed 4 wires inside the outer jacket of insulation.
Three of the wires function in the remote release, the 4th green wire is superfluous.
The white wire acts as the common wire, and attaches to the top pin in the Canon body pictured above. The yellow wire is the Focus wire, and attaches to the lower right pin in the Canon body. The pink wire is the Shutter wire, and obviously this attaches to the lower left pin in the Canon body.
I cut the green wire out of the way, and stripped the insulation off the other three wires. The female stereo jack was up first. I attached this to the N3 plug end of the Adidt cord. After sliding the strain relief and body housing down the Adidt cord (so that they can be assembled after soldering the wires), I picked where I was going to solder each wire. The only requirement here is that you be consistent when choosing where to solder each wire onto the plugs. I chose to run the white wire to the post corresponding to the tip of the stereo plug. The yellow focus wire was soldered to the post for the middle segment of the stereo plug. The pink shutter wire was soldered to the body of the stereo plug.
The completed soldering job is pictured below. Make sure to clean up any loose strands of copper wire so that you don't accidentally make contact between two of the posts. Before sealing all this up, plug the N3 connector into the body and use a bit of paper clip or tweezers to short across the pairs of pins. Do this to ensure tht your wiring is intact. Additionally, try plugging the male stereo jack into the female jack and shorting across the pins of the male jack. This further ensures that you have continuity through the plugs. After soldering and testing, I crimped the strain relief around the outer black insulation of the Adidt cord in order to take any strain off of the solder joints themselves.
Whatever pattern of wiring you commit to on the female plug needs to be replicated on the male plug. As shown below, I once again soldered the white common wire to the tip post of the stereo plug, the yellow focus wire to the middle post, and the pink shutter wire to the main body post of the stereo plug. The strain relief was then crimped around the outer insulation of the Adidt cord.
After all the soldering and reassembly was complete, I had a functional remote release cord once again. For normal 3-ft cord length, I just plug the stereo jacks together. If I need a longer cord, I can simply insert a stereo extension cord in between my male and female jack to give meany length of cord I need.
This entire project, including the cost of the remote release unit, shipping, and the stereo plugs, cost $25. That doesn't include the cost of whatever stereo extension cord I end up getting in the future, but I have several laying around from other projects already. The splicing takes about 30 minutes if you're all set up and ready to go.
I'll also add a comment on the Adidt M1 remote release cord for those who are contemplating purchasing it. First off, it's cheap, both inprice and construction. That's okay though, since it's not doingany thing complicated. The switch is designed with only one button. Holding the button halfway down activates the autofocus, just like pressing the shutter button halfway down on the camera body. If you continue to push all the way down, the shutter activates. The operational feel is similar to the shutter button on the camera in terms of pressure, but it obviously doesn't feel as high quality as the camera's shutter button.
For bulb exposures, the Adidt remote release button is pressed all the way down, and then slides forward to lock into place. With the camera in bulb mode and the switch locked forward, the shutter will stay open until you come back and release the switch on the Adidt control. This feature alone justified the price of the release for me, as it makes long night exposures infinitely easier, allowing you to leave the camera and go grab another beer during the exposure.
posted by Luke Miller at 7:43 PM ![]()
![]()


<< Home