Quantifying western blots without expensive commercial quantification software.
Edit 2011: There continues to be a number of papers published using the
'Photoshop method' that was originally published here. In an effort to force
scientists to stop being lazy and start doing their analyses correctly (i.e. using
the ImageJ routine outlined below), I have
removed the Photoshop and freehand methods from this page. If you desperately
need to see the original Photoshop methods in order to verify the methods of
an already-published paper, please contact me via email for a pdf copy of the
original version of this page. Moving forward, please use the ImageJ gel
analysis process described below, or use the updated version found at http://lukemiller.org/index.php/2010/11/analyzing-gels-and-western-blots-with-image-j/
![]() If you're
looking for a more comprehensive workflow option for your western blot analyses,
please visit my tutorial on using
Image Studio
Lite
, a free software package from LI-COR Biosciences. The Image Studio Lite
software can be downloaded for free from
www.licor.com/islite.
In addition to the functionality described below for ImageJ, Image Studio Lite
provides additional data management features along with annotation tools for
producing publication-ready images of your westerns.
If you're
looking for a more comprehensive workflow option for your western blot analyses,
please visit my tutorial on using
Image Studio
Lite
, a free software package from LI-COR Biosciences. The Image Studio Lite
software can be downloaded for free from
www.licor.com/islite.
In addition to the functionality described below for ImageJ, Image Studio Lite
provides additional data management features along with annotation tools for
producing publication-ready images of your westerns.
Comparing the intensity of bands on a Western blot can be done in a number of ways using software that is commonly found on lab computers or freely available for download. The following document outlines some of those methods.
To start with, you'll need to scan in your x-ray film on a flat-bed scanner. This should be a scanner capable of scanning transparencies (i.e. film). You can scan the film as a gray-scale image, and set the resolution to a medium value (600dpi). Turn off any auto-exposure or other software tweaks built into your scanner software so that you get an unadulterated scan of the x-ray film.
The Photoshop method
Note: I have removed the Photoshop tutorial from this page because it was subject to far too much user bias in the band selection process. The good news is that you can use the freely available, cross-platform, Java-based ImageJ program to carry out your western blot analysis. See the instructions below or visit the updated page here.
___________________________________________________________________________
The ImageJ method (version 1)
Note: I have also removed the 'ImageJ method (version 1)' section from this page in hopes that you will use the proper ImageJ gel analysis routine outlined below or the updated instructions on this page.
_____________________________________________________________________________
The ImageJ method (version 2)
Edit 2010: Please note that an updated and expanded version of this method is available at http://lukemiller.org/index.php/2010/11/analyzing-gels-and-western-blots-with-image-j/
The homepage for ImageJ is here: http://rsb.info.nih.gov/ij/index.html wherein you can find links to the download, documentation, additional plugins and so on.
This method is the Gel Analysis method outlined in the ImageJ documentation: Gel Analysis. You may prefer to use it instead of the methods outlined below. There will likely be very little difference in the results between the various methods.
1. Open your image file.
2. Go to Analyze>Gels>Gel Analyzer Options and click the boxes for Label With Percentages, Outline Lanes and Invert Peaks.
3. Choose the Rectangular Selection tool. Draw a rectangle around your first lane. Encompass some area of the lane above and below the band of interest. Edit July 2009: Note that for a gel with the lanes oriented vertically as shown here (i.e. the visible bands are horizontal across the image), you want to make your bounding rectangle taller than it is wide. However, if you have the image rotated so that the lanes are running horizontally, you need to make your bounding rectangle at least twice as wide as it is tall, at which point ImageJ will recognize that your lanes are horizontal and it will allow you to move the box up or down the image to enclose the neighboring lanes.
4. Press the 1 button (or go to Analyze>Gels>Select First Lane). A new window will pop up with a copy of your image and a label over your first rectangular selection.

5. Use the arrow keys to move the rectangle over the next lane. Press 2 (or go to Analyze>Gels>Select Next Lane) to place a selection around the lane. Repeat this for each lane on the membrane, moving the box and pressing 2to place the selection.

6. When finished, press 3 (or go to Analyze>Gels>Plot Lanes), which pops up a new window with a profile plot of each lane.

7. Now choose the Straight Line selection tool. At the base of each peak, draw a line from one side of the peak to the other. This encloses the area of the peak. The tails to either side of the peak are the background signal. Note that if you have many lanes, the later lanes will be hidden at the bottom of the profile plot. To see these lanes, press and hold the space bar, and use the mouse to drag the profile plot upwards.
8. When each peak has been closed off at the base with the Straight Line tool, choose the Wand (Wand tracing tool) from the tool palette.

9. Using the space bar and mouse, drag the profile plot back down until you are at the top peak. With the wand, click inside the peak. Repeat this for each peak as you go down the profile plot.

10. When each peak has been selected, go to Analyze>Gels>Label Peaks. This labels each peak with its size expressed as a percentage of the total size of all the measured peaks. You can go to the Results window and choose Edit>Copy All to copy the results for placing in a spreadsheet.

Note: If you accidentally click in the wrong place with the Wand, the program still records that clicked area, and it will factor into the total area used to calculate the percentages. Obviously this would skew your results if you click in areas that aren't peaks. Therefore, if you should click in the wrong place, simply go to Analyze>Gels>Label Peaks to plot the current results, which displays these incorrect values, but more importantly resets the counter for the Results window. If you now go back to the Profile Plot and click in the peaks with the Wand, the Results window clears and starts over. When you're sure you've clicked in the correct peaks without accidentally clicking in any wrong areas, you can go back to Analyze>Gels>Label Peaks and get the correct results.
__________________________________________________________________________
Data analysis
See the data analysis steps outlined here: http://lukemiller.org/index.php/2010/11/analyzing-gels-and-western-blots-with-image-j/
__________________________________________________________________________
Addendum
With regard the the ImageJ gel analysis routine (method 2 above), there has been some question of what the values reported by ImageJ correspond to. The images below may help illustrate what ImageJ is measuring.

In the image above, I have drawn out a set of fake "bands" in Adobe Illustrator. The gray value and area of each band are listed above the band. Additionally, I have included the "area" value returned by ImageJ after plotting the bands and clicking in each peak with the Wand tool. Note that these "area" values are a RELATIVE measure of the size and density of each peak you clicked with the wand tool. When you halve the area of a band, but maintain the same gray value (compare lanes 1+2), the value reported by ImageJ is half as large. By the same token, if you halve the gray value but maintain the same area (compare lanes 1+5),the value reported by ImageJ is halved.

The same holds true for bands of different shapes. In the image above, altering the shape of the band, but maintaining the same gray value and area (compare lanes 1+3) yields an equivalent value from ImageJ.
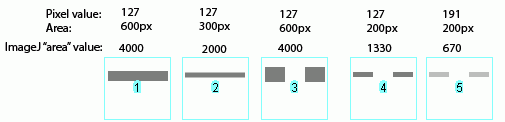
ImageJ also accounts for gaps in a band, as shown above. Compare lanes1+3, which both have an equal number of gray pixels and equal gray values (i.e. equal amounts of protein on the gel). Image-J reports the same "area" value for both of these lanes.
It is worth reiterating that the "area" values and percentages reported by ImageJ are always relative to the total size and density of bands that you have selected in a particular image. In the image immediately above, the band in column 1 returns an "area" value of 4000, while in the previous two images column 1 had the same size band, but with twice the gray value, which in both cases also returned a value of 4000. The raw values returned by ImageJ are meaningless for comparing across different gels, since they are only a relative measure of the bands you've highlighted on a particular gel image. This is why we need to standardize to some common standard loaded onto all of the gels.
(Edit July 2009) This may be a bad sign for my career, but it seems that this set of instructions is quickly on its way to becoming my most heavily cited publication in the scientific literature (see my "real" publications here (pdf) ).
For instance:
Corpas F. J., et al. 2008. Metabolism of Reactive Nitrogen Species inPea Plants Under Abiotic Stress Conditions. Plant Cell Physiology,49(11):1711-1722
Luhtala N. & Parker, R, 2009. LSM1 over-expression in Saccharomyces cerevisiae depletes U6snRNA levels. Nucleic AcidsResearch, doi: 10.1093/nar/gkp572
Miller, R. K. et al. 2009. CSN-5, a Component of the COP9SignalosomeComplex, Regulates the Levels of UNC-96 and UNC-98, twoComponents of M-lines in C.elegans Muscle. MolecularBiology of the Cell
Chiang, E. T. et al, 2009. Protective effects of high-molecular weightPolyethylene Glycol (PEG) in human lung endothelial cell barrier regulation: Role of actin cytoskeletal rearrangement. Microvascular Research 77(2):174-186