Twittering BBQ
My barbecue has its own Twitter account. If you want to follow along when I smoke some brisket or fish, hit up http://twitter.com/lukesbbq. Please understand that this account will send out an automated update every 30 minutes when I'm cooking, so the novelty may wear off quickly. Below is a description of how I set this up.
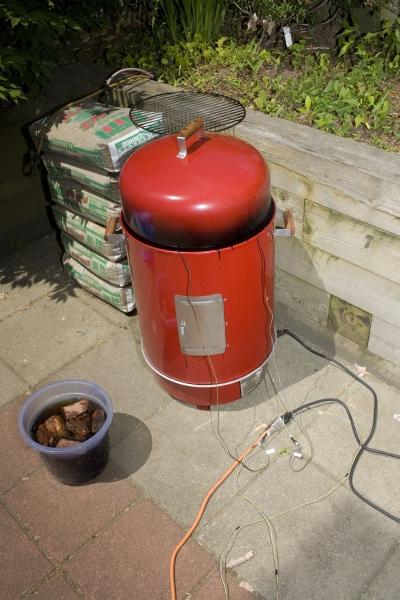
This is my Brinkmann "Gourmet" Electric Smoker. It is a decent piece of kit in stock form, but it does let the internal temperature climb too high quite often. The heating element is an unregulated 1500W electric element that is simply "on" all the time. On a warm day, this can bring the smoker temperature above 250F, too hot for proper barbecuing. I set out to cure this issue by controlling the power to the heating element in order to regulate the temperature of the smoker.
The easiest way to do this is to cut power to the heating element when the smoker temperature exceeds some preset limit, and turn it back on when the smoker cools off. I accomplished this using a relatively expensive solution, but it's what I had laying around.
Measuring temperature
The first step is to monitor the temperature in the smoker. I had purchased a pair of digital thermometers with probes that are meant to be inserted into your meat all the time.
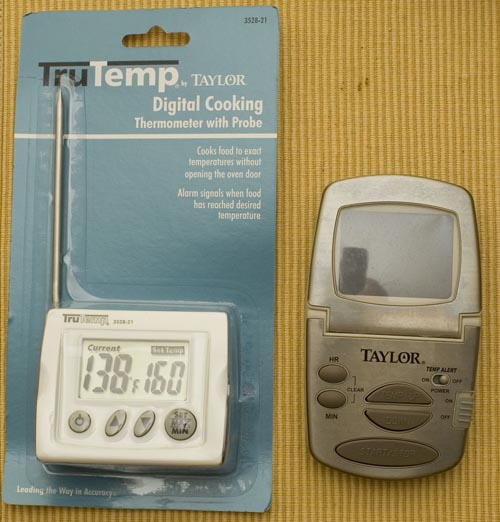
Taylor makes a variety of digital thermometers that all use the same stainless steel temperature probe (seen in the package on the left). These thermometers are available at many outlets (I found mine at Target and a local grocery store) and come in a number of models at different price points. The cheap models use the same stainless steel probe with 4' silicone cord as the more expensive thermometer/timer units. The probe itself contains a thermistor, a resistor that changes its resistance based on its temperature. This thermistor can be wired into a Wheatstone bridge to produce a voltage that varies with the temperature of the probe. I elected to monitor the temperature by building a Wheatstone bridge with 3 resistors (47k ohm) and the probe as the fourth leg. I powered this bridge with the 5 volt supply provided by a National Instruments USB-6008 Data Acquisition Card. I then read the voltage from the thermistor bridge using one of the analog input channels (in differential mode) on the USB-6008.
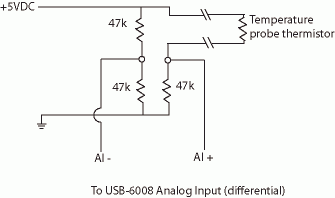
Basic wheatstone bridge schematic
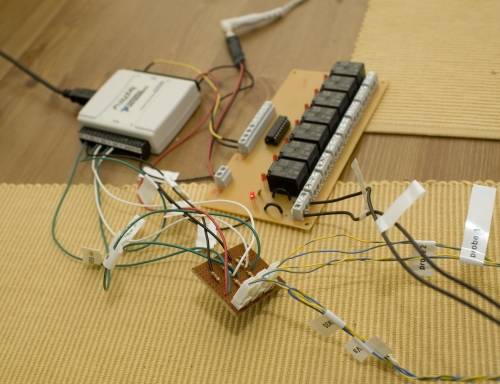
In the final version I ended up using three temperature probes, so I put three Wheatstone bridges on the little perf board below. The output from each of the three bridges is run to a separate analog input channel on the USB-6008. To get the temperature probes out to the BBQ, I made extension wires that run from the perf board to the patio, where the temperature probes plug in and get inserted into the BBQ.
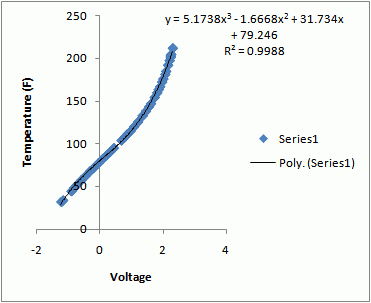
The output of the temperature probe/wheatstone bridge setup needed to be calibrated in order to produce a temperature. I did this by placing the temperature probes in a beaker of water alongside an alcohol thermometer. I slowly heated the water, watching the thermometer temperature and recording the voltage output from the temperature sensor. By plotting these data in Excel, I produced a relationship between sensor voltage and temperature in Fahrenheit using a 3rd order polynomial. This is accurate to better than 1 degree F over the range of 0 to 212F. Each of the temperature probes from the three different models of Taylor digital thermometers is interchangeable, since they all use the same thermistor in the probe (they have a resistance of ~166k at 0F, and around 50k at room temperature).
Controlling the heater
Now that I know the temperature in the BBQ, I can now use the same USB-6008 DAQ to control the power to the heating element in the BBQ. This is accomplished by using a digital output line from the USB-6008 to control a relay that supplies power to the heater. The TTL digital signal from the USB-6008 by itself is not sufficient to power a relay though, so the TTL signal is first fed to a ULN2803 Darlington array. The ULN2803 takes a digital signal from the USB-6008 and switches power from a 12V power supply to drive the coil of a relay.
The relay control board can be seen in the background next to the wheatstone bridge board. The 12V DC power controlled by the ULN2803 is fed to a 2-gang electical outlet box that houses a solid-state relay and a 120VAC electrical outlet, seen below.
The 2-gang box holds a Kyoto KD20C75AX solid state relay. This unit can be controlled by a 4-32V DC signal, and will happily control a 120VAC load of up to 75 amps peak current draw. The 75A peak rating might be overkill for what should be a 12.5A load from the heating element (1500W/120V = 12.5A), but the relay definitely gets hot to the touch running this load.
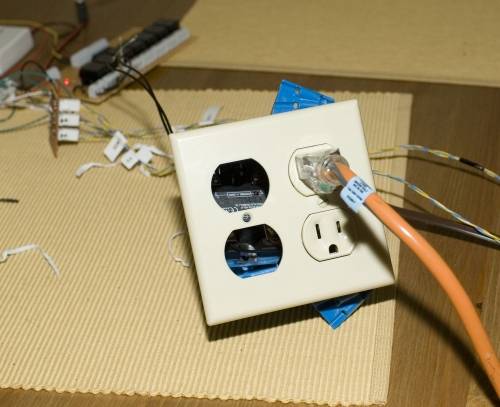
The electrical outlet on the right side of the 2-gang box is wire to an extension cord that runs to the mains power. Instead of wiring this extension cord directly into the outlet, I ran the hot leg through the solid state relay to control power to the outlet. By doing this, the outlet (and anything plugged into it) are switched on and off by the USB-6008. As shown above, I plug in an extension cord to run out to the BBQ.
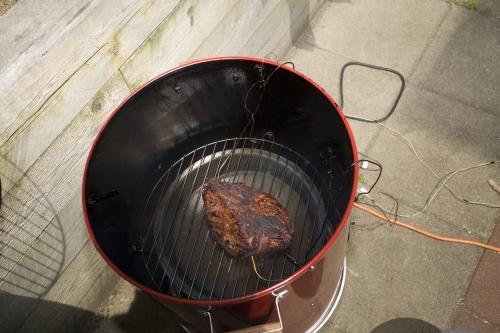
The view inside the BBQ shows a roast with the temperature probes inserted into it for this test. Normally one of the temperature probes is mounted so that it hangs in the air in the upper portion of the BBQ, monitoring the air temperature. The other two probes can be put into whatever I'm cooking.
The program
With all of the hardware setup, the last piece of the puzzle is the software that will control everything. I used Labview 8.2 to build a simple program to monitor the temperatures and control the power to the BBQ.
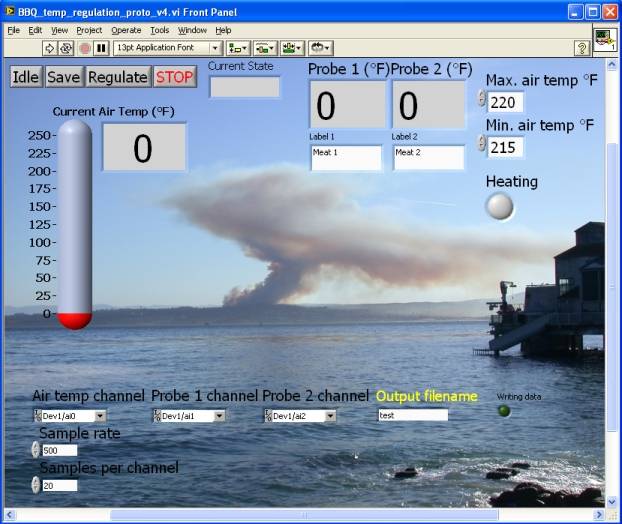
The program monitors air temperature several times per second. The current air temperature is compared to the upper and lower air temperature limits set in the upper right of the control panel. When air temperature exceeds the upper threshold, power is cut off to the heating element. When air temperature drops back down below the minimum threshold, the heating element is turned back on. The thermal inertia in the BBQ is sufficient that you don't need to factor in any sort of hysteresis in the program to prevent the heater control from flipping on and off too quickly. The program will also save the temperatures once a minute in a text file should you want to replay the whole cooking endeavor at a later date.
The basic program worked fine, until I saw a post by Jarrett Byrnes at I'm a chordata! Urochordata! describing his newfound ability to post to Twitter from within the R statistical language. It occurred to me that this might be useful for the BBQ, so I went hunting for an implementation in Labview. That led me to a NI Developer Zone Community post about posting updates in Twitter. Unfortunately the code posted there only works in Labview version 8.6 or later, but there was enough information in the example schematic to write my own Twitter update vi. After integrating this into my BBQ control program, I can now have the BBQ post updates to its Twitter account at 30-min or hourly intervals, and send an additional notification when one of the meat temperature probes exceeds a chosen temperature (i.e. >160F).
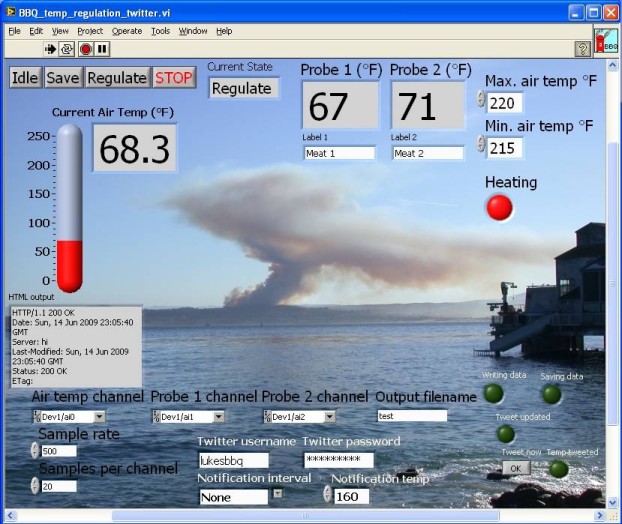
The twittering (tweeting, whatever) BBQ control program
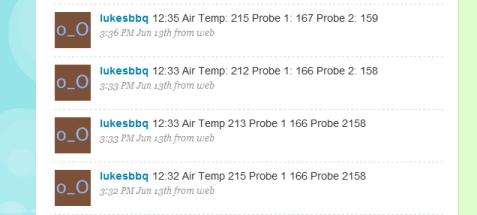
The Twitter results. The format changed through time as I refined the formatting.
While a twittering BBQ might seem silly, this does act as a proof-of-concept for my plans to integrate a Twitter updating feature in some of my laboratory experiments that run for days or weeks. The Twitter update is extremely easy to implement (see the "Send_Twitter_update.vi" below), at least until Twitter starts requiring a more secure authentication procedure. This can be used to send regular updates to your cell phone via SMS to show that things are running properly or to send alerts when some variable goes out of bounds. The Twitter update vi could certainly use improvements, particularly with how it responds to errors or connection timeouts (it doesn't do anything right now), but the basics are there.
The BBQ control programs and sub-vi's necessary to run them are provided here. They were developed with Labview 8.2.1 and DAQmx 8.9.
The first three vi's will do the basic temperature monitoring, BBQ control, and data recording. The second vi (thermistor_read.vi) contains the parameters for converting voltage to temperature. Those parameters are specific to my setup, and need to be changed for other wheatstone bridge and temperature probe setups. The third vi is just a file initialization routine.
BBQ_temp_regulation_proto_v4.vi
sub-vi: thermistor_read.vi
sub-vi:BBQ_output_file_initialization.vi
The Twitter-updating BBQ control is:
BBQ_temp_regulation_twitter.vi
sub-vi: Prep_Twitter_update.vi
sub-vi: Send_Twitter_update.vi
The "BBQ_temp_regulation_twitter.vi" needs "thermistor_read.vi" to run in addition to the two Twitter-related vi's. If you only want a vi to post updates to Twitter, "Send_Twitter_update.vi" will do that on its own. Just supply it a message, a username, and a password.
This is my Brinkmann "Gourmet" Electric Smoker. It is a decent piece of kit in stock form, but it does let the internal temperature climb too high quite often. The heating element is an unregulated 1500W electric element that is simply "on" all the time. On a warm day, this can bring the smoker temperature above 250F, too hot for proper barbecuing. I set out to cure this issue by controlling the power to the heating element in order to regulate the temperature of the smoker.
The easiest way to do this is to cut power to the heating element when the smoker temperature exceeds some preset limit, and turn it back on when the smoker cools off. I accomplished this using a relatively expensive solution, but it's what I had laying around.
Measuring temperature
The first step is to monitor the temperature in the smoker. I had purchased a pair of digital thermometers with probes that are meant to be inserted into your meat all the time.
Taylor makes a variety of digital thermometers that all use the same stainless steel temperature probe (seen in the package on the left). These thermometers are available at many outlets (I found mine at Target and a local grocery store) and come in a number of models at different price points. The cheap models use the same stainless steel probe with 4' silicone cord as the more expensive thermometer/timer units. The probe itself contains a thermistor, a resistor that changes its resistance based on its temperature. This thermistor can be wired into a Wheatstone bridge to produce a voltage that varies with the temperature of the probe. I elected to monitor the temperature by building a Wheatstone bridge with 3 resistors (47k ohm) and the probe as the fourth leg. I powered this bridge with the 5 volt supply provided by a National Instruments USB-6008 Data Acquisition Card. I then read the voltage from the thermistor bridge using one of the analog input channels (in differential mode) on the USB-6008.
Basic wheatstone bridge schematic
In the final version I ended up using three temperature probes, so I put three Wheatstone bridges on the little perf board below. The output from each of the three bridges is run to a separate analog input channel on the USB-6008. To get the temperature probes out to the BBQ, I made extension wires that run from the perf board to the patio, where the temperature probes plug in and get inserted into the BBQ.
The output of the temperature probe/wheatstone bridge setup needed to be calibrated in order to produce a temperature. I did this by placing the temperature probes in a beaker of water alongside an alcohol thermometer. I slowly heated the water, watching the thermometer temperature and recording the voltage output from the temperature sensor. By plotting these data in Excel, I produced a relationship between sensor voltage and temperature in Fahrenheit using a 3rd order polynomial. This is accurate to better than 1 degree F over the range of 0 to 212F. Each of the temperature probes from the three different models of Taylor digital thermometers is interchangeable, since they all use the same thermistor in the probe (they have a resistance of ~166k at 0F, and around 50k at room temperature).
Controlling the heater
Now that I know the temperature in the BBQ, I can now use the same USB-6008 DAQ to control the power to the heating element in the BBQ. This is accomplished by using a digital output line from the USB-6008 to control a relay that supplies power to the heater. The TTL digital signal from the USB-6008 by itself is not sufficient to power a relay though, so the TTL signal is first fed to a ULN2803 Darlington array. The ULN2803 takes a digital signal from the USB-6008 and switches power from a 12V power supply to drive the coil of a relay.

The relay control board can be seen in the background next to the wheatstone bridge board. The 12V DC power controlled by the ULN2803 is fed to a 2-gang electical outlet box that houses a solid-state relay and a 120VAC electrical outlet, seen below.
The 2-gang box holds a Kyoto KD20C75AX solid state relay. This unit can be controlled by a 4-32V DC signal, and will happily control a 120VAC load of up to 75 amps peak current draw. The 75A peak rating might be overkill for what should be a 12.5A load from the heating element (1500W/120V = 12.5A), but the relay definitely gets hot to the touch running this load.
The electrical outlet on the right side of the 2-gang box is wire to an extension cord that runs to the mains power. Instead of wiring this extension cord directly into the outlet, I ran the hot leg through the solid state relay to control power to the outlet. By doing this, the outlet (and anything plugged into it) are switched on and off by the USB-6008. As shown above, I plug in an extension cord to run out to the BBQ.
The view inside the BBQ shows a roast with the temperature probes inserted into it for this test. Normally one of the temperature probes is mounted so that it hangs in the air in the upper portion of the BBQ, monitoring the air temperature. The other two probes can be put into whatever I'm cooking.
The program
With all of the hardware setup, the last piece of the puzzle is the software that will control everything. I used Labview 8.2 to build a simple program to monitor the temperatures and control the power to the BBQ.
The program monitors air temperature several times per second. The current air temperature is compared to the upper and lower air temperature limits set in the upper right of the control panel. When air temperature exceeds the upper threshold, power is cut off to the heating element. When air temperature drops back down below the minimum threshold, the heating element is turned back on. The thermal inertia in the BBQ is sufficient that you don't need to factor in any sort of hysteresis in the program to prevent the heater control from flipping on and off too quickly. The program will also save the temperatures once a minute in a text file should you want to replay the whole cooking endeavor at a later date.
The basic program worked fine, until I saw a post by Jarrett Byrnes at I'm a chordata! Urochordata! describing his newfound ability to post to Twitter from within the R statistical language. It occurred to me that this might be useful for the BBQ, so I went hunting for an implementation in Labview. That led me to a NI Developer Zone Community post about posting updates in Twitter. Unfortunately the code posted there only works in Labview version 8.6 or later, but there was enough information in the example schematic to write my own Twitter update vi. After integrating this into my BBQ control program, I can now have the BBQ post updates to its Twitter account at 30-min or hourly intervals, and send an additional notification when one of the meat temperature probes exceeds a chosen temperature (i.e. >160F).
The twittering (tweeting, whatever) BBQ control program
The Twitter results. The format changed through time as I refined the formatting.
While a twittering BBQ might seem silly, this does act as a proof-of-concept for my plans to integrate a Twitter updating feature in some of my laboratory experiments that run for days or weeks. The Twitter update is extremely easy to implement (see the "Send_Twitter_update.vi" below), at least until Twitter starts requiring a more secure authentication procedure. This can be used to send regular updates to your cell phone via SMS to show that things are running properly or to send alerts when some variable goes out of bounds. The Twitter update vi could certainly use improvements, particularly with how it responds to errors or connection timeouts (it doesn't do anything right now), but the basics are there.
The BBQ control programs and sub-vi's necessary to run them are provided here. They were developed with Labview 8.2.1 and DAQmx 8.9.
The first three vi's will do the basic temperature monitoring, BBQ control, and data recording. The second vi (thermistor_read.vi) contains the parameters for converting voltage to temperature. Those parameters are specific to my setup, and need to be changed for other wheatstone bridge and temperature probe setups. The third vi is just a file initialization routine.
BBQ_temp_regulation_proto_v4.vi
sub-vi: thermistor_read.vi
sub-vi:BBQ_output_file_initialization.vi
The Twitter-updating BBQ control is:
BBQ_temp_regulation_twitter.vi
sub-vi: Prep_Twitter_update.vi
sub-vi: Send_Twitter_update.vi
The "BBQ_temp_regulation_twitter.vi" needs "thermistor_read.vi" to run in addition to the two Twitter-related vi's. If you only want a vi to post updates to Twitter, "Send_Twitter_update.vi" will do that on its own. Just supply it a message, a username, and a password.
posted by Luke Miller at 4:59 PM
![]()
![]()